- Published on
Building an Upgrade Dialog with Shadcn and Zustand in Next.js
- Authors

- Name
- Shelton Ma
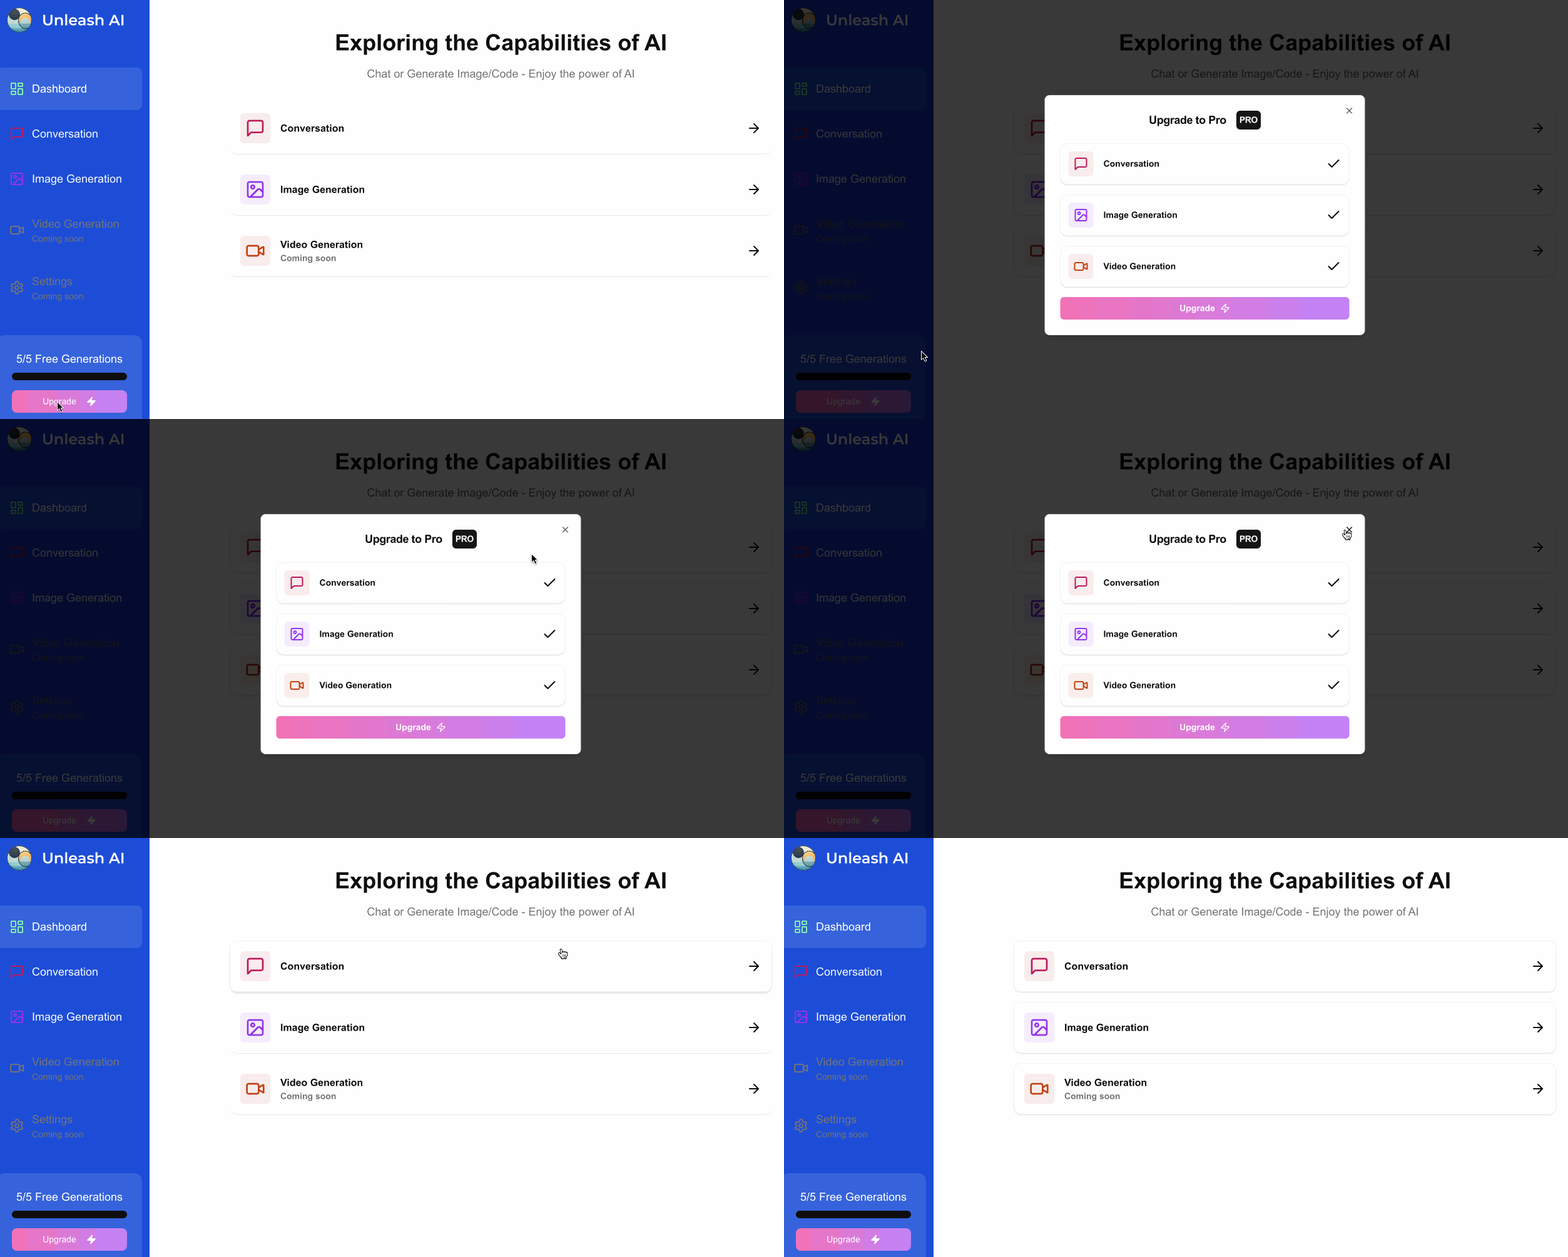
0. Demo of the Dialog
Below is a demo showcasing the functionality and design of the dialog, or you can visit the page: unleashai for more details:

1. Install Packages
npx shadcn@latest add dialog badge
pnpm add zustand
2. Create Global State with Zustand
// src/features/saas/store/use-pro-modal.tsx
import { create } from "zustand";

interface useProModalState {
  isOpen: boolean;
  open: () => void;
  close: () => void;
}

export const useProModal = create<useProModalState>((set) => ({
  isOpen: false,
  open: () => set({ isOpen: true }),
  close: () => set({ isOpen: false }),
}));
3. Create the Modal Component
// src/components/pro-modal.tsx
"use client";

import { Badge } from "@/components/ui/badge";
import { Button } from "@/components/ui/button";
import { Card } from "@/components/ui/card";
import {
  Dialog,
  DialogContent,
  DialogDescription,
  DialogFooter,
  DialogHeader,
  DialogTitle,
} from "@/components/ui/dialog";
import { useProModal } from "@/features/saas/hooks/use-pro-modal";
import { cn } from "@/lib/utils";
import { Check, Zap } from "lucide-react";

const tools = [
  {
    label: "Conversation",
    icon: MessageSquare,
    color: "text-pink-700",
    bgColor: "bg-pink-700/10",
  },
  {
    label: "Image Generation",
    icon: ImageIcon,
    color: "text-purple-600",
    bgColor: "bg-purple-600/10",
  },
  {
    label: "Video Generation",
    icon: VideoIcon,
    color: "text-orange-700",
    bgColor: "bg-orange-700/10",
  },
];

export const ProModal = () => {
  const { isOpen, close } = useProModal();
  return (
    <Dialog open={isOpen} onOpenChange={close}>
      <DialogContent className="z-50">
        <DialogHeader>
          <DialogTitle className="flex items-center justify-center gap-4 pb-2">
            Upgrade to Pro
            <Badge className="uppercase text-sm p-1 rounded-md">pro</Badge>
          </DialogTitle>
          <DialogDescription className="pt-2 text-center space-y-4">
            {tools.map((tool) => (
              <Card
                key={tool.label}
                className="p-3 flex items-center justify-between border-black/5"
              >
                <div className="flex items-center gap-4">
                  <div className={cn("p-2 w-fit rounded-md", tool.bgColor)}>
                    <tool.icon className={cn("w-6 h-6", tool.color)} />
                  </div>
                  <div className="text-sm font-semibold">{tool.label}</div>
                </div>
                <Check />
              </Card>
            ))}
          </DialogDescription>
        </DialogHeader>
        <DialogFooter>
          <Button variant="premium" className="w-full font-semibold">
            Upgrade <Zap />
          </Button>
        </DialogFooter>
      </DialogContent>
    </Dialog>
  );
};
4. Add Modal to the Layout
Integrate the ProModal into your application’s layout by creating a ModalProvider.
// src/components/modal-provider.tsx
"use client";

import { ProModal } from "@/components/pro-modal";
import { useEffect, useState } from "react";

export const ModalProvider = () => {
  const [mounted, setMounted] = useState(false);

  useEffect(() => {
    setMounted(true);
  }, []);

  if (!mounted) return null;

  return (
    <>
      <ProModal />
    </>
  );
};

// src/app/(dashboard)/layout.tsx
import { Providers } from "@/components/providers";

export default function RootLayout({
  children,
}: Readonly<{
  children: React.ReactNode;
}>) {
  return (
    <html lang="en">
      <body
        className={`${geistSans.variable} ${geistMono.variable} antialiased`}
      >
        <ModalProvider />
        <Providers>{children}</Providers>
        <Analytics />
      </body>
    </html>
  );
}
5. Trigger the Modal
...
import { useProModal } from "@/features/saas/hooks/use-pro-modal";

const { open } = useProModal();

<Button
  variant="premium"
  className="text-white w-full rounded-lg"
  onClick={open}
>
  Upgrade <Zap className="w-4 h-4 ml-2 fill-white" />
</Button>
...